Introduction
In this guide we will go over creating a Proxmox KVM Template from a Cloud Image. This same process will work for any Cloud-Init Openstack based image type you can find online.
Having done a number of these for our Proxmox based VPS service I wanted to post up a guide to help anyone else looking to do the same thing.
My workflow for customizing one of those for use with Proxmox with cloud-init deployment from WHMCS and root login is below. Once you setup one template you can rapidly reinstall new containers and test stuff.
Setup Environment
If not installed already installed you will need
apt-get install libguestfs-tools
To edit the image before importing. We will use
For the sake of sanity, I highly advise setting your default editor to “nano” because using the default
You can see your default editor with the the below command.
printenv | grep EDITOR
To set nano as default if it’s not already. use the below command. Please Note: nano should be installed(should be by default on Ubuntu/Debian systems)
export EDITOR=nano
It should now look like the below.
root@coby:~# printenv | grep EDITOR
EDITOR=/bin/nano
root@coby:~#
Grab the Cloud Image
Grab the cloud image base link for desired OS: Openstack has a nice page on this: https://docs.openstack.org/image-guide/obtain-images.html
These are some direct links:
https://cloud.centos.org/centos/7/images/
https://cloud-images.ubuntu.com/
https://repo.almalinux.org/almalinux/8/cloud/x86_64/images/
Ssh into your Proxmox server and fetch the image directly to the server. This saves you having to upload it to the server later.
wget https://cloud.centos.org/centos/7/images/CentOS-7-x86_64-GenericCloud-1907.qcow2
Customize Image
We can now use
Here is the format for the command to edit by hand.
virt-edit -a Cloudimagefilename /path/to/file/in/disk/image/cloud.cfg
So for our example of “CentOS-7-x86_64-GenericCloud-1907.qcow2” to open up the “/etc/cloud/cloud.
virt-edit -a CentOS-7-x86_64-GenericCloud-1907.qcow2 /etc/cloud/cloud.cfg
Once opened it will look something like this.
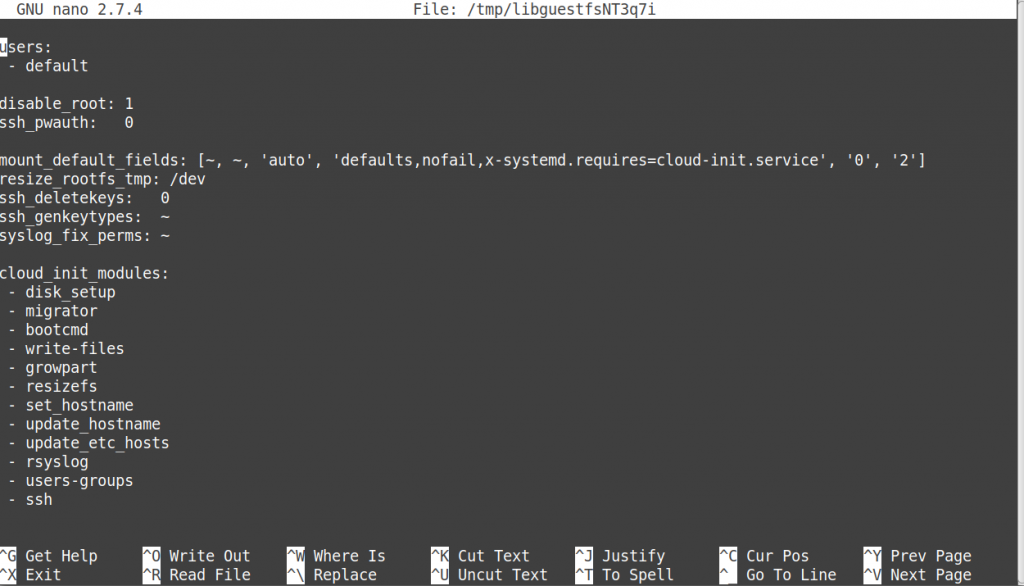
The first thing you want to do is carefully edit the disable_root: 1 to disable_root: 0 This will set cloud-init to not disable this in the /etc/ssh/sshd_config on first boot and allow root based logins. It should look like the below.
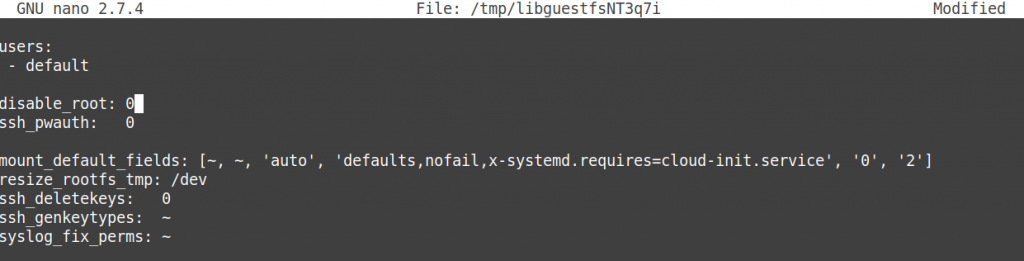
Please note some OS cloud images use “true” or “false” where 1=true and 0=false. If they are using true and false vs 1 and 0 please use that formatting.
Once fixed it will look like this.
Another way to do the above is automatically via sed like manner non-interactively as outlined in the below link.
https://libguestfs.org/virt-edit.1.html#non-interactive-editing
To enable root and password logins for example the below commands could be used which accounts for all variations of True/true/1 being set which has it disabled.
virt-edit -a ${image_name} /etc/cloud/cloud.cfg -e 's/disable_root: [Tt]rue/disable_root: False/'
virt-edit -a ${image_name} /etc/cloud/cloud.cfg -e 's/disable_root: 1/disable_root: 0/'
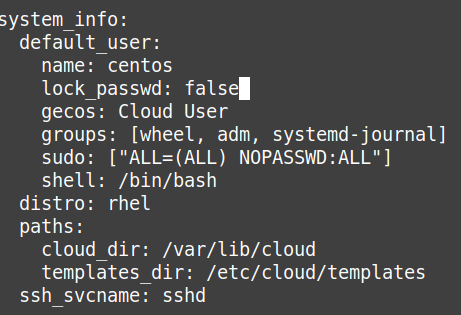
virt-edit -a ${image_name} /etc/cloud/cloud.cfg -e 's/lock_passwd: [Tt]rue/lock_passwd: False/'
virt-edit -a ${image_name} /etc/cloud/cloud.cfg -e 's/lock_passwd: 1/lock_passwd: 0/'
virt-edit -a ${image_name} /etc/cloud/cloud.cfg -e 's/ssh_pwauth: 0/ssh_pwauth: 1/';packages:
- qemu-guest-agent
- nano
- wget
- curl
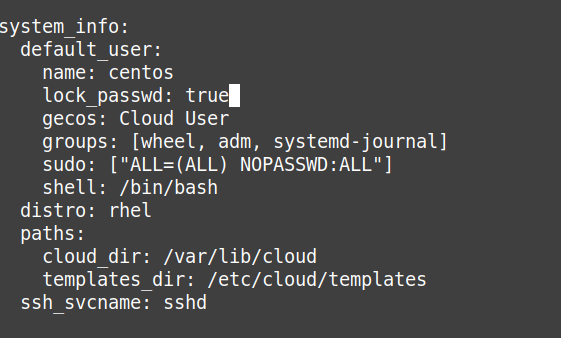
- net-toolsShould look like this. Sometimes I have to put these packages above the ssh_svcname: sshd block for some OS. So if it doesn’t work insert it above that block. See the cloud-init documentation for more details.

Now you can use ctrl+x and hit y to save and exit.
You can also splice in packages which is faster directly into the image which saves on the install first boot time by using virt-customize to inject/install packages into the image like in the below command.
virt-customize --install cloud-init,atop,htop,nano,vim,qemu-guest-agent,curl,wget -a ${image_name}Modify the sshd_config
Now we need to ensure the default /etc/ssh/sshd_config is setup to our liking and allows root login. We need to ensure the below values are set.
PermitRootLogin yes
PasswordAuthentication yes
So now we reopen the image but this time were editing the file “/etc/ssh/sshd_config”
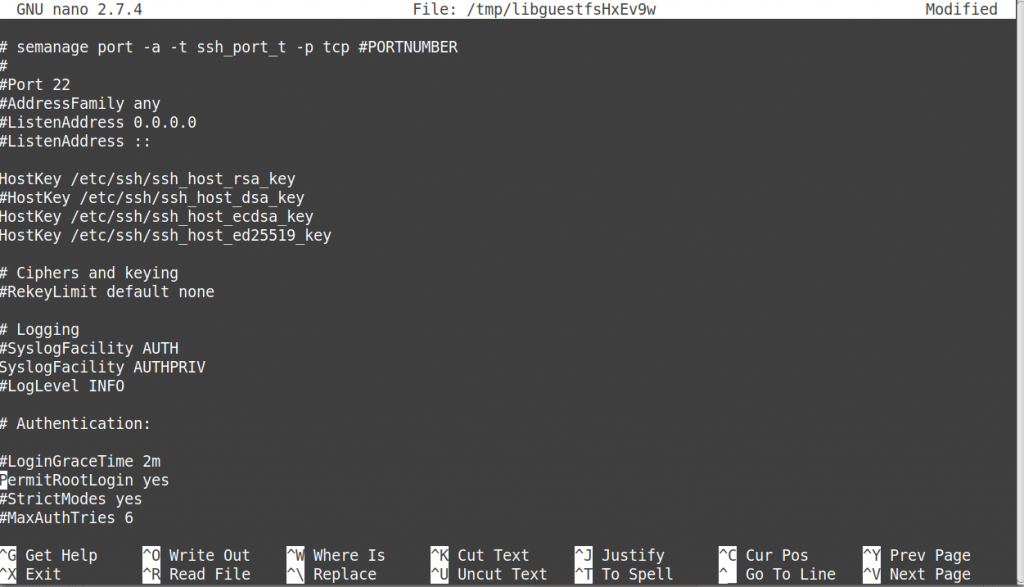
virt-edit -a CentOS-7-x86_64-GenericCloud-1907.qcow2 /etc/ssh/sshd_config
Now we need to look for “PermitRootLogin” it may be commented out or set to “PermitRootLogin no” or “PermitRootLogin without-password”. make sure only one occurrence is enabled and it says “PermitRootLogin yes” like the below example.
To enable root logins via ssh and password authentication the below command will also handle that for you.
virt-edit -a ${image_name} /etc/ssh/sshd_config -e 's/PasswordAuthentication no/PasswordAuthentication yes/';
virt-edit -a ${image_name} /etc/ssh/sshd_config -e 's/PermitRootLogin [Nn]o/PermitRootLogin yes/';
virt-edit -a ${image_name} /etc/ssh/sshd_config -e 's/#PermitRootLogin [Yy]es/PermitRootLogin yes/';
virt-edit -a ${image_name} /etc/ssh/sshd_config -e 's/#PermitRootLogin prohibit-password/PermitRootLogin yes/'
Now we will scroll down and verify that “PasswordAuthentication yes” is set. Sometimes it is sometimes it isn’t so always check. In this template it was enabled. So we can save and close this now if no other customization’s are needed.

Editing existing images of imported images
Occasionally you will find you got everything except one thing working and you want to modify the image of existing VM. This is totally possible just ensure that the guest VM is completely powered off first.
To edit an already imported disk. This example is based on the
virt-edit -a /var/lib/vz/images/104/vm-104-disk-0.raw /etc/cloud/cloud.cfg
Creating VM
Here we are going to tie it all together.
Create the VM: See the official link > https://pve.proxmox.com/wiki/Cloud-Init_Support
You may need to create the container if it does not exist already. The below is based on my storage for OS template VM using “local” storage yours may be “
Create a new VM
qm create 9000 --memory 2048 --net0 virtio,bridge=vmbr0
Import the downloaded disk to local storage
qm importdisk 9000 CentOS-7-x86_64-GenericCloud-1907.qcow2 local
Finally attach the new disk to the VM as scsi drive
qm set 9000 --scsihw virtio-scsi-pci --scsi0 local:vm-9000-disk-1
Add Cloud-Init CDROM drive
The next step is to configure a CDROM drive which will be used to pass the Cloud-Init data to the VM.
qm set 9000 --ide2 local:cloudinit
To be able to boot directly from the Cloud-Init image, set the bootdisk parameter to scsi0, and restrict BIOS to boot from disk only. This will speed up booting, because VM BIOS skips the testing for a bootable CDROM.
qm set 9000 --boot c --bootdisk scsi0
Also configure a serial console and use it as a display. Many Cloud-Init images rely on this, as it is an requirement for OpenStack images.
qm set 9000 --serial0 socket --vga serial0
In a last step, it is helpful to convert the VM into a template. From this template you can then quickly create linked clones. The deployment from VM templates is much faster than creating a full clone (copy).
qm template 9000
Create a clone from the previous template.
qm clone 9000 123 --name Centos-7-Minimal
Batch mode:
If you want to do this for a lot it can be tedious but you can do it pretty quickly with the below as a reference. The only thing to really change would be the cloud_image_url and vm_id variable and the rest should just go like clockwork.
vm_id='2010'
cloud_img_url='https://cloud-images.ubuntu.com/daily/server/groovy/current/groovy-server-cloudimg-amd64-disk-kvm.img'
image_name=${cloud_img_url##*/} # focal-server-cloudimg-amd64.img
wget ${cloud_img_url}
# virt-edit -a ${image_name} /etc/cloud/cloud.cfg
virt-edit -a ${image_name} /etc/cloud/cloud.cfg -e 's/disable_root: [Tt]rue/disable_root: False/'
virt-edit -a ${image_name} /etc/cloud/cloud.cfg -e 's/disable_root: 1/disable_root: 0/'
virt-edit -a ${image_name} /etc/cloud/cloud.cfg -e 's/lock_passwd: [Tt]rue/lock_passwd: False/'
virt-edit -a ${image_name} /etc/cloud/cloud.cfg -e 's/lock_passwd: 1/lock_passwd: 0/'
virt-edit -a ${image_name} /etc/cloud/cloud.cfg -e 's/ssh_pwauth:   0/ssh_pwauth:   1/'
virt-edit -a ${image_name} /etc/ssh/sshd_config -e 's/PasswordAuthentication no/PasswordAuthentication yes/'
virt-edit -a ${image_name} /etc/ssh/sshd_config -e 's/PermitRootLogin [Nn]o/PermitRootLogin yes/'
virt-edit -a ${image_name} /etc/ssh/sshd_config -e 's/#PermitRootLogin [Yy]es/PermitRootLogin yes/'
virt-edit -a ${image_name} /etc/ssh/sshd_config -e 's/#PermitRootLogin prohibit-password/PermitRootLogin yes/'
virt-edit -a ${image_name} /etc/ssh/sshd_config -e 's/[#M]axAuthTries 6/MaxAuthTries 20/'
virt-customize --install cloud-init,atop,htop,nano,vim,qemu-guest-agent,curl,wget -a ${image_name}
qm create ${vm_id} --memory 512 --net0 virtio,bridge=vmbr0,firewall=1
qm importdisk ${vm_id} ${image_name} local
qm set ${vm_id} --ide0 local:cloudinit
qm set ${vm_id} --boot c --bootdisk scsi0
qm set ${vm_id} --serial0 socket --vga serial0
qm template ${vm_id}
Create a text file named images.txt
https://cloud-images.ubuntu.com/bionic/current/bionic-server-cloudimg-amd64.img
https://cloud-images.ubuntu.com/focal/current/focal-server-cloudimg-amd64-disk-kvm.img
https://cloud-images.ubuntu.com/minimal/releases/focal/release/ubuntu-20.04-minimal-cloudimg-amd64.img
https://cloud-images.ubuntu.com/daily/server/groovy/current/groovy-server-cloudimg-amd64-disk-kvm.img
https://cloud-images.ubuntu.com/hirsute/current/hirsute-server-cloudimg-amd64.img
https://cdimage.debian.org/cdimage/openstack/current-10/debian-10-openstack-amd64.qcow2
https://cdimage.debian.org/cdimage/openstack/current-9/debian-9-openstack-amd64.qcow2
http://cloud.centos.org/centos/7/images/CentOS-7-x86_64-GenericCloud.qcow2
https://cloud.centos.org/centos/8/x86_64/images/CentOS-8-GenericCloud-8.2.2004-20200611.2.x86_64.qcow2
https://cloud.centos.org/centos/8-stream/x86_64/images/CentOS-Stream-GenericCloud-8-20210210.0.x86_64.qcow2
https://download.fedoraproject.org/pub/fedora/linux/releases/32/Cloud/x86_64/images/Fedora-Cloud-Base-32-1.6.x86_64.qcow2
https://github.com/rancher/os/releases/download/v1.5.5/rancheros-openstack.img
https://mirror.pkgbuild.com/images/v20210315.17387/Arch-Linux-x86_64-cloudimg-20210315.17387.qcow2
https://repo.almalinux.org/almalinux/8/cloud/x86_64/images/AlmaLinux-8-GenericCloud-latest.x86_64.qcow2
https://mirror.pkgbuild.com/images/v20210315.17387/Arch-Linux-x86_64-cloudimg-20210315.17387.qcow2
Then you can run the below. I have done a loop through a bunch of urls like the below to prep them all in batch mode.
for cloud_img_url in $(cat images.txt); do image_name=${cloud_img_url##*/};echo "Downloading ${image_name}";wget ${cloud_img_url};do echo "Editing ${image_name}";virt-edit -a ${image_name} /etc/cloud/cloud.cfg -e 's/disable_root: [Tt]rue/disable_root: False/'; virt-edit -a ${image_name} /etc/cloud/cloud.cfg -e 's/disable_root: 1/disable_root: 0/';virt-edit -a ${image_name} /etc/cloud/cloud.cfg -e 's/ssh_pwauth: 0/ssh_pwauth: 1/';virt-edit -a ${image_name} /etc/cloud/cloud.cfg -e 's/lock_passwd: [Tt]rue/lock_passwd: False/';virt-edit -a ${image_name} /etc/cloud/cloud.cfg -e 's/lock_passwd: 1/lock_passwd: 0/';virt-edit -a ${image_name} /etc/ssh/sshd_config -e 's/PasswordAuthentication no/PasswordAuthentication yes/';virt-edit -a ${image_name} /etc/ssh/sshd_config -e 's/PermitRootLogin [Nn]o/PermitRootLogin yes/';virt-edit -a ${image_name} /etc/ssh/sshd_config -e 's/#PermitRootLogin [Yy]es/PermitRootLogin yes/';virt-edit -a ${image_name} /etc/ssh/sshd_config -e 's/#PermitRootLogin prohibit-password/PermitRootLogin yes/';virt-edit -a ${image_name} /etc/ssh/sshd_config -e 's/#MaxAuthTries 6/MaxAuthTries 20/';virt-customize --install cloud-init,atop,htop,nano,vim,qemu-guest-agent,curl,wget -a ${image_name};mv ${image_name} /var/lib/vz/template/kvm/${image_name};doneConclusion
I hope you found this tutorial helpful in creating a Proxmox cloud-init KVM template. There is so much more you can do with cloud-init and libguestfs-tools like injecting apps and repos in the image before its even booted. We recommend making backups before major edits so you can revert back to the base image if there is an issue.
Resource and reference links.
https://docs.openstack.org/image-guide/modify-images.html
http://libguestfs.org/virt-edit.1.html
https://www.poftut.com/linux-kvm-qemu-virt-customize-tutorial/
virt-customize --run-command 'yum -y install network-scripts traceroute atop sysstat' -a /var/lib/vz/images/104/vm-104-disk-0.raw